|
SPECIFICATIONS AND TIPS |
|||||||||||||||||||||||||||||||||||||||||||||||||||||||||||||||||
| FILE REQUIREMENTS - CUSTOMER PROVIDED ARTWORK | |||||||||||||||||||||||||||||||||||||||||||||||||||||||||||||||||
|
Some customers prefer to provide their own artwork files for their sign
projects. Sign Pro is able to work with several different PC file
formats, but there are certain formats that work better than others.
Here are some guidelines for making your files work with our design and
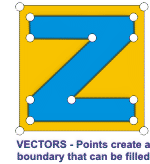
production systems. FOR PROJECTS USING CUT VINYL- We need a file in vector format (see below). Vectors contain paths around individual components of the graphic, enabling the plotter to cut along these paths. Overlapping  paths should be welded or trimmed so that the plotter
program will not cut through other graphic elements. Vectors print
very well on our Roland digital printer and do not require welding or
trimming. We suggest using RGB colors if possible. CMYK
colors are converted in the rasterizing process (RIP) by the software
used with the printer and color matches are not always true. If
you have specific colors you wish to match (such as Pantones), please
provide the color numbers for reference and we will attempt to match the
color as closely as possible.
paths should be welded or trimmed so that the plotter
program will not cut through other graphic elements. Vectors print
very well on our Roland digital printer and do not require welding or
trimming. We suggest using RGB colors if possible. CMYK
colors are converted in the rasterizing process (RIP) by the software
used with the printer and color matches are not always true. If
you have specific colors you wish to match (such as Pantones), please
provide the color numbers for reference and we will attempt to match the
color as closely as possible.Preferred file formats are .ai, .eps, .pdf or .cdr. Please note that these files support a combination of vectors and bitmaps. Bitmaps require tracing to produce a cut path for the plotter and that can involve significant design time. We also suggest converting any text to curves (or outlines). If we do not have the font, our design software will substitute a font that may not be correct. You can also provide us with the font information which we may be able to match. FOR DIGITALLY PRINTED JOBS- We can print vectors or bitmaps. Bitmaps saved at finished project size print the best, but sometimes the file size can get very large. We can enlarge smaller image files, but this results in pixelization where the resulting print will look grainy or fuzzy. RGB files in .jpg or .tif formats are preferrable and provide for very good color matching. CMYK, Pantone and other color pallettes are not as accurately matched in the RIP process required for printing. Sign Pro is able to print Acrobat files (.pdf) but the results vary depending on the content of the file. Text enhancements, drop shadows, blends and combinations of vector and bitmap art don't always print as intended. We are able to import Acrobat files into our design programs which enable us to correct most issues in the file, but it may involve some design time. To ensure we produce the results you are expecting, please submit a smaller .jpg image file along with your original artwork so we see how the finished product should look when completed. A preview file sized at around 1000 pixels in height and/or width is suggested. | |||||||||||||||||||||||||||||||||||||||||||||||||||||||||||||||||
 |
|||||||||||||||||||||||||||||||||||||||||||||||||||||||||||||||||
| AI.... | |||||||||||||||||||||||||||||||||||||||||||||||||||||||||||||||||
 Artificial
Intelligence (AI) tools allow for the creation of images based on a
user's input of a text script. Dynamic and imaginative designs can be
achieved. However, AI designs are created and saved in a bitmap form
(see below) and require a large amount of editing outside of the AI
design system. Furthermore, the tools available to most consumers
produce images which are low in resolution and smaller in size. The
quality of the image degrades significantly if the image size is changed
for reproduction such as signs or banners. Artificial
Intelligence (AI) tools allow for the creation of images based on a
user's input of a text script. Dynamic and imaginative designs can be
achieved. However, AI designs are created and saved in a bitmap form
(see below) and require a large amount of editing outside of the AI
design system. Furthermore, the tools available to most consumers
produce images which are low in resolution and smaller in size. The
quality of the image degrades significantly if the image size is changed
for reproduction such as signs or banners.Note that AI creates its output using the information it gleans from the worldwide web. Though not generally an issue, certain elements of an AI image may be subject to copyright laws. AI is a good tool for imagining your design idea, but currently it is not suited for direct to production use. The Sign Pro design team is here to help you achieve the finished product you desire. |
|||||||||||||||||||||||||||||||||||||||||||||||||||||||||||||||||
|
|
|||||||||||||||||||||||||||||||||||||||||||||||||||||||||||||||||
| VECTOR VS. BITMAP - WHAT'S THE DIFFERENCE AND WHY IT'S IMPORTANT | |||||||||||||||||||||||||||||||||||||||||||||||||||||||||||||||||
|
Vectors and Bitmaps are the two most widely used formats used for displaying and printing graphical images on a PC. Both
formats are used extensively in the sign and graphics industry (as well as others) with each having their own distinct characteristics and limitations.
Bitmaps- |
|||||||||||||||||||||||||||||||||||||||||||||||||||||||||||||||||
|
|
|||||||||||||||||||||||||||||||||||||||||||||||||||||||||||||||||
| VINYL INSTALLATION INSTRUCTIONS | |||||||||||||||||||||||||||||||||||||||||||||||||||||||||||||||||
|
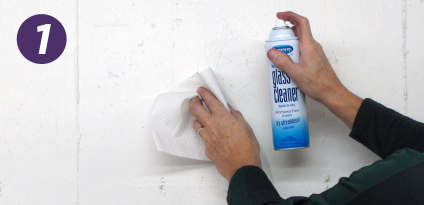
Suggested Installation Supplies: Tape Measurer, Glass Cleaner, Paper Towels,
Masking Tape, Application Squeegee and a Hobby or Utility Knife Note....For graphics covered with Transfer Paper (a liner on top of the graphic), a hard plastic squeegee works best. For installation of graphics without Transfer Paper, such as laminated decals, we recommend using a soft felt squeegee to prevent scuffing of the graphic surface. |
|||||||||||||||||||||||||||||||||||||||||||||||||||||||||||||||||
|
 |
||||||||||||||||||||||||||||||||||||||||||||||||||||||||||||||||
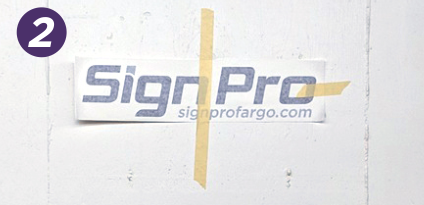
| Clean off the area where the vinyl graphic is going to be installed using a quality glass cleaner or solvent, removing all surface impurities. Use a paper towel to remove residue. | Position the graphic using a tape measure or a level. Use small masking tape pieces to position the material. Place a longer piece of tape down the center of graphic for easier application. | ||||||||||||||||||||||||||||||||||||||||||||||||||||||||||||||||
 |
 |
||||||||||||||||||||||||||||||||||||||||||||||||||||||||||||||||
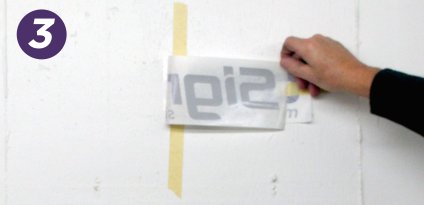
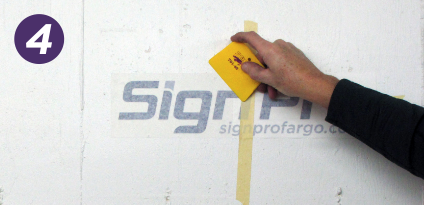
| Applying the vinyl in smaller parts is easier and helps prevent wrinkles. Lift the side to be applied, while holding the graphic away from the surface, use the knife to cut off the backing material. Although not necessary in most cases, a surface misting with application fluid is helpful with large graphics. | Holding the graphic tight and slightly above the surface, use the squeegee to apply the vinyl. Work from the center out using firm, smooth strokes across the entire graphic. | ||||||||||||||||||||||||||||||||||||||||||||||||||||||||||||||||
 |
 |
||||||||||||||||||||||||||||||||||||||||||||||||||||||||||||||||
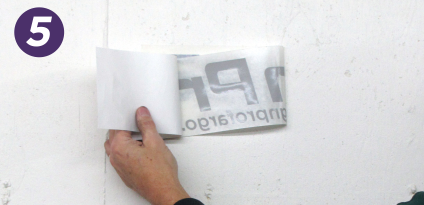
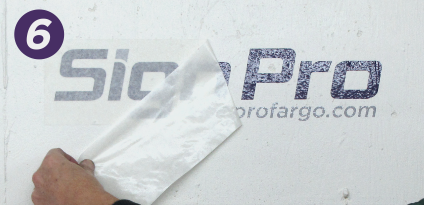
| Remove backing paper from other side and repeat the squeegee application process. Make sure to work contiguously to the end. Bubbles, loose spots or ridges may appear if areas are not squeegeed down completely. | Remove the top liner by pulling at a 45 degree angle. Water can be used on paper-based liners to facilitate removal (if necessary). Air bubbles can be popped using the knife point. In time, vinyl graphics tend to smooth out on their own. | ||||||||||||||||||||||||||||||||||||||||||||||||||||||||||||||||
|
|
|||||||||||||||||||||||||||||||||||||||||||||||||||||||||||||||||

| |||||||||||||||||||||||||||||||||||||||||||||||||||||||||||||||||
 Vectors-
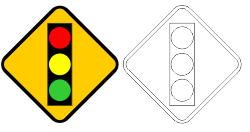 lettering, logos or other graphics
to be in a Vector format. Computerized cutters called Plotters use an intricate knife to follow the outside perimeter of the Vector to produce the detailed
vinyl sections needed to construct a sign. Vectors can easily be resized bigger or smaller without losing quality. It is also possible to manipulate the
points of a Vector graphic to change it's appearance without distorting the overall appearance of the picture. Popular Vector-based design programs include
Adobe Illustrator and Corel Draw. The file extensions for some of the more popular Vector files are .AI, .CDR, .WMF, .CGM and .EPS (note that some of these
files may also contain bitmaps if they were included in the drawing, but in their native format these are Vector files).
lettering, logos or other graphics
to be in a Vector format. Computerized cutters called Plotters use an intricate knife to follow the outside perimeter of the Vector to produce the detailed
vinyl sections needed to construct a sign. Vectors can easily be resized bigger or smaller without losing quality. It is also possible to manipulate the
points of a Vector graphic to change it's appearance without distorting the overall appearance of the picture. Popular Vector-based design programs include
Adobe Illustrator and Corel Draw. The file extensions for some of the more popular Vector files are .AI, .CDR, .WMF, .CGM and .EPS (note that some of these
files may also contain bitmaps if they were included in the drawing, but in their native format these are Vector files).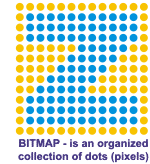 Bitmaps are best
compared to a photograph (which they generally are). To produce a Bitmap, the computer uses a series of dots (pixels) of varying colors placed side-by-side.
When there is a large enough series of dots, a visible image is produced. Increasing the number of dots will increase the size and quality of an image
(and increase the size of the resulting computer file as well). Bitmaps do not work for vinyl cut signs because there is no outside path for the cutter to follow. If we are going to use a Bitmap to produce a vinyl sign, we first have to use a trace program to convert the file to Vector. A trace program looks for
dots of a similar color and then draws an outline around the like color group.
Tracing a Bitmap can take a lot of work to "clean up" the resulting trace
file so that it will look good on the final project.
Bitmaps are best
compared to a photograph (which they generally are). To produce a Bitmap, the computer uses a series of dots (pixels) of varying colors placed side-by-side.
When there is a large enough series of dots, a visible image is produced. Increasing the number of dots will increase the size and quality of an image
(and increase the size of the resulting computer file as well). Bitmaps do not work for vinyl cut signs because there is no outside path for the cutter to follow. If we are going to use a Bitmap to produce a vinyl sign, we first have to use a trace program to convert the file to Vector. A trace program looks for
dots of a similar color and then draws an outline around the like color group.
Tracing a Bitmap can take a lot of work to "clean up" the resulting trace
file so that it will look good on the final project.
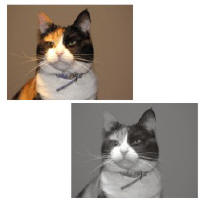 With the digital imaging capabilities available at Sign Pro, we are able to print Bitmap images on vinyl
that can then be applied to various materials (Vectors can also be printed). For a quality reproduction, an original Bitmap in a high resolution is needed
(with a lot of pixels). Small Bitmaps can be stretched to a larger size, but quality is lost and the image will appear fuzzy (since enlarging only makes the
pixels larger, it does not add new pixels to the stretched image). The use of Bitmaps on signs has vastly expanded what can be included on the finished project.
No longer are you limited to varying layers of vinyl to produce a finished image. Bitmaps come in various formats as well with the most popular being .JPG,
.GIF and .PNG files (widely used on the Internet) as well as .BMP.
With the digital imaging capabilities available at Sign Pro, we are able to print Bitmap images on vinyl
that can then be applied to various materials (Vectors can also be printed). For a quality reproduction, an original Bitmap in a high resolution is needed
(with a lot of pixels). Small Bitmaps can be stretched to a larger size, but quality is lost and the image will appear fuzzy (since enlarging only makes the
pixels larger, it does not add new pixels to the stretched image). The use of Bitmaps on signs has vastly expanded what can be included on the finished project.
No longer are you limited to varying layers of vinyl to produce a finished image. Bitmaps come in various formats as well with the most popular being .JPG,
.GIF and .PNG files (widely used on the Internet) as well as .BMP.